on
DIY air quality sensor: A dockerized minimal web interface for SDS011
Two weeks ago, with New Year’s Eve (and its pollution levels) around the corner, I was given a nova PM sensor (SDS011) by my granddad (pretty cool granddad, right?). Having done mostly computing online courses (FromNand2Tetris; Programming Languages) during the last weeks, I decided to get practical and to use the opportunity to build an application that talks to the SDS011 and visualizes the air quality levels, while learning to use Docker (an incredibly powerful application virtualization software).
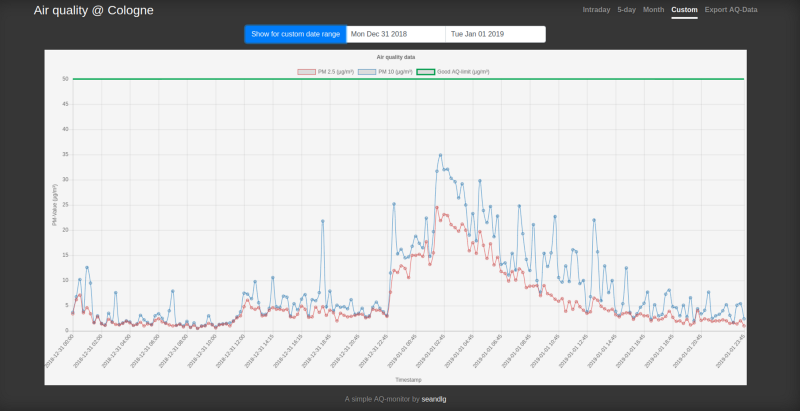
Air quality @ Cologne
Now before I go into some details of the build, for anybody simply wanting to replicate this webapp: You’re (likely) in luck:
Docker frees you from the dependency hell — with a twist (for this concrete project): You’ve got to use a Linux OS. Since I don’t have a Windows / Mac machine at home anymore, I never checked the build on either and can only assume that some additional work has to be done to correctly give the sensor-container access to the USB port of the sensor (which for Linux is accessible through /dev/ttyUSB0).
- Install
docker&docker-compose(you might want to check for a more recent version of docker-compose than1.23.2; otherwise simply copy & paste the (single) line):
sudo apt install docker.io && curl -L https://github.com/docker/compose/releases/download/1.23.2/docker-compose-`uname -s`-`uname -m` -o /usr/local/bin/docker-compose && chmod +x /usr/local/bin/docker-compose
- Clone the Github repository
git clone https://github.com/seandlg/sds011docker.git
- Compose the application-consortium from within the sds011docker folder (add the
-doption for detached mode if you want to run everything in the background)
sudo docker-compose up --build
You should now be running a nodejs server at localhost:80; open any modern web browser and type in localhost into the address bar (default port is port 80 already) to see the web interface. The sensor will turn on for about 7 seconds every 15 minutes and write a new data point into a MongoDB database. This database is queried every time somebody visits localhost (i.e. performs a simple GET request), with the query string specifying the time frame of interest.
How does this work?
It turns out that many people have previously built software for the SDS011. I therefore didn’t have to start from scratch and could use a Python script for communication with the sensor (unfortunately I cannot seem to find the original source anymore). The entire application lives on three containers.
- Sensor: This application talks to the sensor every 15 minutes (through a simple cronjob); it connects to the database using the python package
pymongo. - Database: A pretty standard MongoDB instance. Runs locally on port
27017and can (for instance) be inspected through Robo3T. - Webapp: An nodejs powered Express server that serves the (static) website and also acts as the interface between the end-user (you) and the database. I’ve decided to convert date objects to their respective Unix time to allow for simple querying of the database, though I’m not sure this is the easiest way to go about doing this.
Now using Docker, all dependencies live within the respective containers (though for the Webapp being powered through nodejs there is arguably already a pretty good chance that you won’t have dependency errors). These containers will look the same on any operating system. In particular, notice that the containers do not carry a guest operating system (as it would be the case with virtual machines).
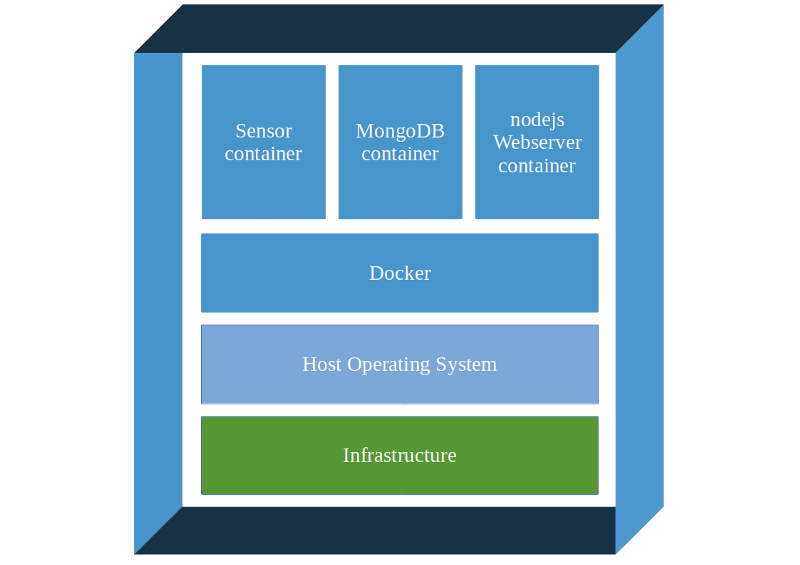
The Docker Pipeline.
Running this app on a Raspberry Pi (armv61)
I quickly came to the realization that I would like to run this app on a Raspberry Pi that I have flying around. However, this does not work as expected, as the Raspberry Pi ships with an ARM processor, which uses a different instruction set from the widely used x86 instruction set. Though I am not fully satisfied with the solution I decided to:
- Replace the sensor container with the python script running locally. It only requires few dependencies and Python runs on the Raspbian OS already.
- Replace the MongoDB database with an online instance of MongoDB, which is available freely from mLab (note that this means that the Raspberry needs internet access now; on the upside, a broken SD card won’t mean that your data is gone).
- Adapt the Webapp to run on a nodejs ARM-compatible image.
This is far from an ideal solution, but given the limited time I had for this project, it seemed like a workable quick fix to me.
Results
The results look promising. With minimal investments of about $30-$50 (depending on where you buy the SDS011 and which Raspberry you use) you get a fully working personal air quality sensor. But not only that, you get historic data saved to a database, which allows you to easily further analyze it in the future.
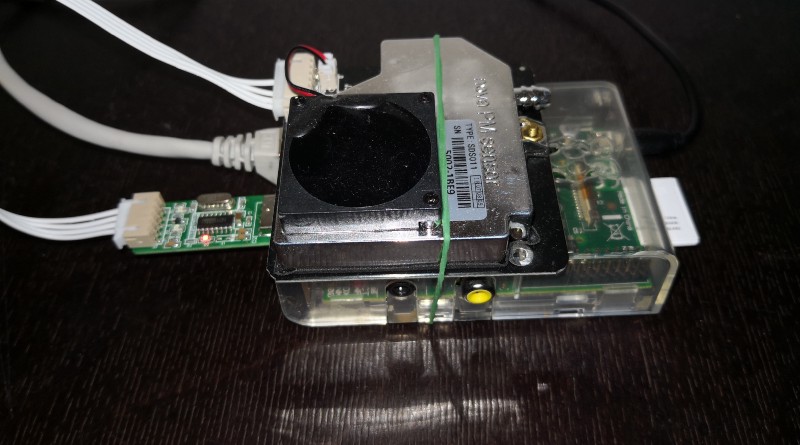
Final build with a Raspberry Pi.
Remarks
Among other things, I used Datepickk, this Bootstrap theme and chartjs.